Apple's AirPods Pro are a significant upgrade from the base AirPods model, offering enhanced audio quality, improved battery life, and several impressive features to boost your listening experience. This article will guide you through the best tips and tricks to help you get the most out of your premium wireless earbuds.
Take the Ear Tip Fit Test
One of the most significant improvements of the AirPods Pro is its customizable in-canal design, allowing for a snugger fit than the one-size-fits-all approach of the regular AirPods. To find the best ear tip size for you, take an Ear Tip Fit Test.
After attaching a pair of ear tips to the base of your AirPods Pro, insert them into your ears. On your iPhone, navigate to Settings > Bluetooth, then tap the info icon next to your AirPods Pro and select Ear Tip Fit Test. A short music clip will play, and the app will determine if the current tips offer a good fit or if you need to adjust them or try a different size.

Customize the Name of Your AirPods Pro
You're not stuck with the default name of your AirPods Pro. To change it, go to "Settings > Bluetooth" on your iPhone, tap the info icon next to your AirPods Pro, then tap on the current name. You can revise the existing name or delete it and create a new one. Tap "Done" when finished.

Control Music With a Press
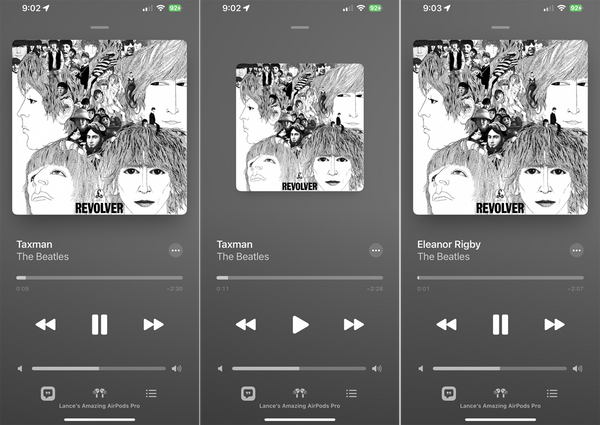
Press the stem of either AirPod to control the flow of music. A single press pauses or plays the music, a double press skips forward to the next track, and a triple press skips back to the start of your current track or to the previous track.
Customize the Presses
Pressing and holding the stem of either AirPod Pro switches between Noise Cancellation and Transparency by default. You can customize this by going to Settings > Bluetooth, pressing the info icon next to your AirPods, and then under the Press and Hold AirPods section, tapping the entry for Left or Right.

Turn on Noise Cancellation
The Noise Cancellation feature of AirPods Pro blocks out almost all background sounds, making it useful in noisy environments where you want to focus on your audio. You can switch between Noise Cancellation and Transparency mode with a long press on the stem of either bud. On your iPhone, you can go through the Control Center or Settings > Bluetooth > [Your AirPods info icon] to adjust this feature.

Tweak Accessibility Settings
The Accessibility settings of your AirPods Pro allow you to change the speed required to press the stems of your AirPods and the duration needed for pressing the stems to change the noise cancellation mode. You can also enable noise cancellation with one AirPod and control the volume swipe.

Improve Sound Quality
Headphone Accommodations is a feature that enhances the audio from your AirPods by boosting softer sounds and certain frequencies. Go to Settings > Bluetooth > [Your AirPods info icon] > Accessibility > Audio Accessibility Settings > Headphone Accommodations and turn on the switch.

Turn on Spatial Audio
A unique feature to AirPods Pro and the third-generation AirPods is Spatial Audio, which provides head tracking and surround-sound effects to supported videos. This feature requires iOS 14 or higher and the AirPods Pro firmware updated to version 3A283 or higher.

Enable Adaptive Transparency on 2nd Gen AirPods Pro
The second-generation AirPods Pro features Adaptive Transparency, which automatically reduces the volume of any loud sounds around you to protect your hearing. You can enable this option in the settings.

Share With Other AirPods Users
You can share your audio with someone else using AirPods Pro, regular AirPods, or Beats headphones. Access the Control Center on your iPhone, tap the AirPlay icon for the current audio, then tap Share Audio and select the other headphones.

Turn Your AirPods Into a Hearing Aid
You can use your AirPods Pro as a hearing aid with the Live Listen feature. Add the feature to the Control Center on your iPhone, put the AirPods Pro in your ears, open the Control Center, tap the Hearing icon, and turn on Live Listen.

Check the Battery Charge
You can check the current charge of your AirPods Pro and their charging case on your iPhone. With both AirPods Pro in the case and the lid open, a card will appear on your iPhone's screen showing the charge levels.

Optimize Battery Charging
To extend the battery life of your AirPods Pro, enable Optimized Battery Charging in the settings. This feature will delay charging past 80% until you need to use them.
Save Battery Life by Swapping Buds
If you're a power user and worry about running out of battery life, you can use one AirPod at a time as a Bluetooth headset, keeping the other one in the case to charge, and swap as needed.
Learn more: