This guide is tailored for all iPad users, regardless of the model you own. We'll navigate through the simple yet vital process of taking screenshots, covering both iPads with a Home button and the sleeker, Home button-less designs. By the end, you'll not only master the art of capturing your screen but also learn how to edit, share, and manage these digital keepsakes. Let's unlock this fundamental feature together, enhancing your iPad experience one screenshot at a time.
Preparing Your iPad for Screenshots
Before snapping a screenshot, a bit of prep ensures your captures are clear and clutter-free. Here’s a quick checklist:
Adjusting Settings
- Brightness: Set to a comfortable level to make sure your screenshot looks good.
- Orientation: Decide between portrait or landscape based on what you're capturing. Use the orientation lock if needed.
- Zoom/Font Size: Adjust for better readability if capturing text.
Clearing the Screen
- Notifications: Swipe away notifications or enable Do Not Disturb to keep them off your screenshot.
- Sensitive Data: Scan for and remove or hide personal info visible on the screen.
- Close Unused Apps/Tabs: Keep your screenshot focused on what matters.
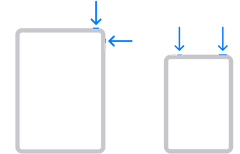
Taking a Screenshot on an iPad with a Home Button
Press & Release
Simultaneously press and quickly release both the top button and the Home button. You’ll hear a camera shutter sound (if your volume is on), indicating that a screenshot has been taken.

Screenshot Preview
Right after taking the screenshot, a thumbnail appears temporarily in the lower-left corner of your screen. This is your cue that the screenshot was successful.
Tips
- If the thumbnail bothers you or you’re in a hurry, simply swipe it to the left, and it will disappear, saving the screenshot automatically.
- The editing and sharing tools are intuitive, offering a range of options from basic cropping to more advanced markup tools for detailed annotations.
Taking a Screenshot on an iPad without a Home Button
Capture
Press and quickly release both the top button and the volume up button at the same time. You'll hear the shutter sound or see a brief flash on the screen, signaling a successful screenshot.
Screenshot Preview
A small thumbnail appears in the lower-left corner of the screen immediately after the capture. This thumbnail is your quick access to the screenshot for editing or sharing.
AssistiveTouch to take a screenshot on an iPad
On most iPads, taking a screenshot typically requires using the device's physical buttons. However, for users seeking an alternative method, especially if the buttons are hard to press or if you're looking for a more accessible option, Apple provides a feature called AssistiveTouch that allows you to take a screenshot without using the physical buttons.
Using AssistiveTouch or Back Tap for screenshots is particularly helpful for those who find the physical buttons challenging to use or for situations where you’re using a case or stand that makes accessing the buttons difficult. These features ensure that the functionality of your iPad remains accessible and convenient, aligning with Apple's commitment to accessibility.
Setting Up AssistiveTouch
Enable AssistiveTouch:
- Go to Settings > Accessibility > Touch > AssistiveTouch.
- Toggle on AssistiveTouch. A semi-transparent button will appear on your screen, which you can drag to any edge.
Customize Top Level Menu:
- Within the AssistiveTouch settings, tap on "Customize Top Level Menu."
- Tap the "+" button to add a new icon, then select "Screenshot" from the list of options. This adds a screenshot button directly to the AssistiveTouch menu.
Adjusting Optional Settings:
- You might also want to explore other settings, like creating a custom gesture or adjusting the idle opacity for the AssistiveTouch button, making it less intrusive on your screen.
Taking a Screenshot with AssistiveTouch
- Once you've added the screenshot button to the AssistiveTouch menu, taking a screenshot is easy. Simply tap the AssistiveTouch button on your screen, then tap the screenshot button from the menu. This captures the screen without needing to press any physical buttons.
Additional Accessibility Features
Back Tap: If you have an iPad running iPadOS 14 or later, you might be able to use Back Tap to take screenshots. This feature allows you to take a screenshot by tapping the back of your iPad a certain number of times. However, it's worth noting that not all iPad models support Back Tap.
- To set it up, go to Settings > Accessibility > Touch > Back Tap. From there, you can assign the "Screenshot" action to either Double Tap or Triple Tap.
Advanced Tips and Tricks
Elevate your iPad screenshot game with these advanced tips and tricks. From capturing entire web pages in Safari to using innovative accessibility features and keeping your screenshots organized, here's how to make the most of your iPad's capabilities.
Taking a Full-Page Screenshot in Safari
- Capture the Initial Screenshot: While in Safari, use the standard screenshot method for your iPad model.
- Access Full-Page Option: Tap on the screenshot preview that appears in the corner. At the top, you'll see two options: Screen and Full Page. Tap "Full Page."
- Edit and Save: You can now see the full webpage. Use the sidebar to navigate and mark up any part of the page. When ready, tap "Done" and choose "Save PDF to Files" to save the entire webpage as a PDF file. This option is particularly useful for saving articles, receipts, or any long content for later reference.
Using Back Tap Feature to Take a Screenshot
Note: Back Tap may not be available on all iPad models.
- Enable Back Tap: Go to Settings > Accessibility > Touch > Back Tap. Choose between Double Tap or Triple Tap.
- Assign Screenshot Action: Select "Screenshot" from the list of actions. Now, tapping the back of your iPad two or three times (depending on your choice) will capture a screenshot.
Managing and Organizing Screenshots in the Photos App
- Accessing Screenshots: Open the Photos app. Your screenshots are automatically saved in the "Screenshots" album, making them easy to find.
- Creating Custom Albums: For better organization, consider creating custom albums for different types of screenshots. Tap "New Album" and give it a name, like "Work Screenshots" or "Favorite Memes."
- Deleting Unwanted Screenshots: To keep your storage in check, periodically review your screenshots album and delete those you no longer need. You can select multiple screenshots at once for quicker management.
- Using Favorites: For screenshots you refer to often, tap the heart icon to add them to your "Favorites" album, making them even easier to access.
- Sharing and Exporting: The Photos app makes it simple to share screenshots via email, messages, or social media. For exporting, select the screenshots, tap the share button, and choose your preferred method.
Troubleshooting Common Issues
Even with the straightforward process of taking screenshots on an iPad, you might occasionally run into issues. Here are some common problems and how to troubleshoot them, ensuring you can capture, edit, and share screenshots without hassle.
If Your iPad Doesn't Take a Screenshot
- Check Button Functionality: Ensure that the top (or side) button and Home/volume up button are working properly. If one isn't, it might be a hardware issue.
- Software Glitches: Sometimes, a simple restart can fix unresponsive features. Hold down the top button and either volume button to restart your iPad.
- Software Updates: Make sure your iPad is running the latest version of iPadOS. Go to Settings > General > Software Update to check for and install any updates.
- AssistiveTouch: If physical buttons are the issue, set up AssistiveTouch as described earlier to take screenshots without using the buttons.
Fixing Problems with Screenshot Editing or Sharing
- Editing Issues: If the editing tools are not appearing when you tap on the screenshot preview, ensure your iPad's software is up to date. If the issue persists, try restarting your iPad.
- Sharing Issues: Check your internet connection if you're having trouble sharing screenshots. If the problem is with a specific app, try updating that app or reinstalling it.
- Storage Space: Lack of storage space can sometimes hinder saving or sharing screenshots. Check your storage in Settings > General > iPad Storage and free up space if needed.